A. Removal and disassembly
WARNING:
Securely support the motorcycle so there is no danger of it falling over.
1. Remove the cowling assembly.
2. Disconnect the speedometer cable. Disconnect the brake caliper and remove the front wheel. Place a wooden wedge or other object into the caliper assembly to keep the brake pads from falling out. Remove the front fender.
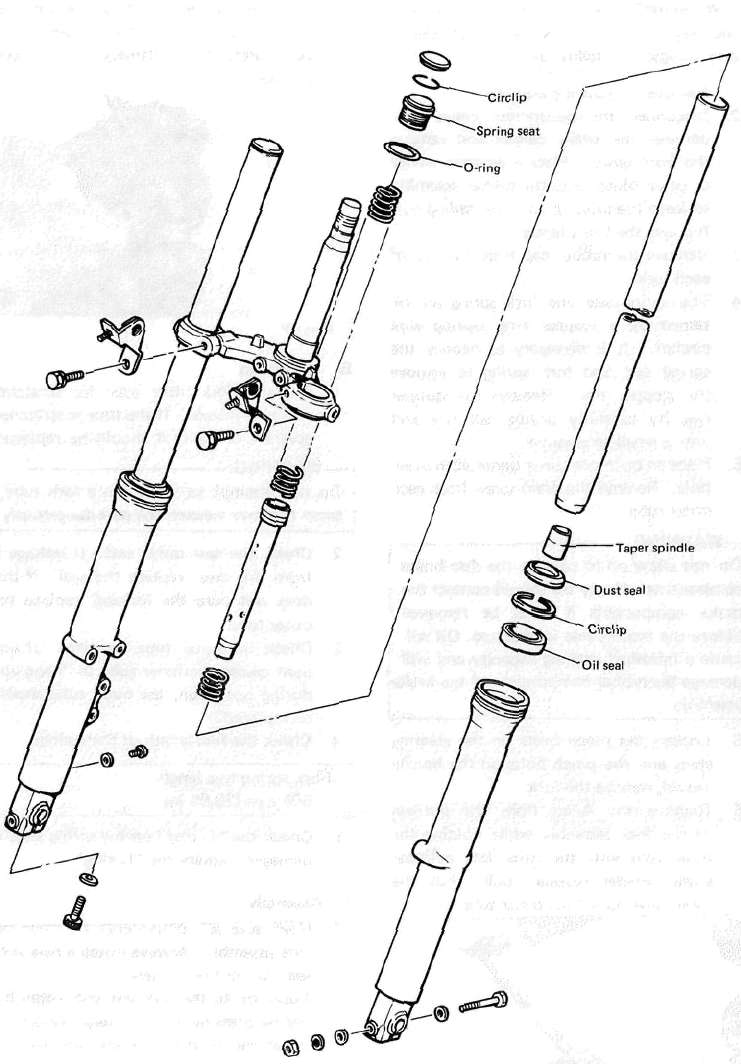
3. Remove the rubber cap from the top of each fork.
4. The spring seat and fork spring are retained by a stopper ring (spring wire circlip). It is necessary to depress the spring seat and fork spring to remove the stopper ring. Remove the stopper ring by carefully prying out one end with a small screwdriver.
5. Place an open container under each drain hole. Remove the drain screw from each outer tube.
WARNING:
Do not allow oil to contact the disc brake components. If any oil should contact the brake components it must be removed before the motorcycle is operated. Oil will cause diminished braking capacity and will damage the rubber components of the brake assembly.
5. Loosen the pinch bolts on the steering stem and the pinch bolts on the handle crown, remove the fork.
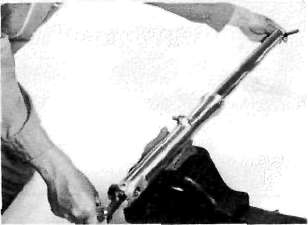
6. Remove the Allen from the bottom of the fork assembly while holding the inner tube with the front fork cylinder comp. holder (special tool). Pull the inner tube out of the outer tube.
7. To remove the fork seal. Pry out the dust seal and remove the spring clip over the oil seal. Pry out the oil seal, being very careful to not damage the fork tube surfaces.

1. Dust seal
B. Inspection
1. Examine fork inner tube for scratches and straightness. If the tube is scratched severely or bent, it should be replaced.
WARNING:
Do not attempt to straighten a fork tube, since this may weaken the part dangerously.
2. Check the seal outer seat. If leakage is from this area, replace the seal. If this does not cure the leakage, replace the outer tube.
3. Check the outer tube for dents. If any dent causes the inner tube to "hang up" during operation, the outer tube should be replaced.
4. Check the free length of the springs.
Fork spring free length: 508 mm (20.00 in)
5. Check the "O-ring" on the spring seat. If damaged, replace the "O-ring",
C. Assembly
1. Make sure all components are clean before assembly. Always install a new fork seal. Do not re-use seal.
2. Apply oil to the fork seal and install the seal by pressing in with a large socket. Install the retaining clip and dust seal.
3. Install the inner tube into the outer tube. Install and tighten alien bolt and washer. The assembly procedure is the reverse of the disassembly procedure.
NOTE:
When installing the fork springs, the greater pitch should be at the bottom. The main fork spring has a small coil diameter at the bottom.
4. Reinstall the spring seat.
CAUTION:
Always use a new stopper ring (spring wire circlip).
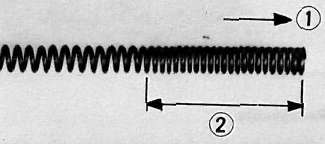
1. Top 2. Small pitch
- Printer-friendly version
- Log in to post comments