A. Removal
1. Remove one (1) rear shock absorber at at time, inspect and reinstall before removing the other.
B. Inspection
1. Check the rod. If it is bent or damaged, replace the shock absorber.
2. Check for oil leakage. If oil leakage is evident, replace the shock absorber.
3. Operate shock absorber rod to check damping. There should be no noticeable damping as the shock extends.
4. Install the shock absorber on the motorcycle.
Tightening torque:
3.0 m-kg (21.5 ft-lb)
DRIVE CHAIN AND SPROCKETS
NOTE:
Please refer to General maintenance and Lubrication charts for additional information.
A. Drive sprocket
With the left crankcase cover removed proceed as follows:
1. Remove the sprocket securing bolts. Remove the holder plate and drive sprocket.
2. Check sprocket wear. Replace if wear decreases tooth width as shown.
3. Replace if tooth wear shows a pattern such as that in the illustration, or as precaution and common sense dictate.
4. Tighten the securing bolts.
Drive sprocket securing bolt torque:
1.0 m-kg (7.2 ft-lb)

1,1/4 tooth 2, Correct 3. Roller 4. Sprocket
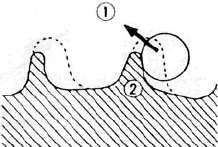
1. Slip off 2. Bent teeth
B. Driven sprocket
With the rear wheel removed, proceed as
follows:
1. Using a blunt chisel, flatten the securing nuts lock washer tabs.
Remove the securing nuts. Remove the lock washers and sprocket.
2. Check the sprocket wear using procedures for the drive sprocket.
3. Check the sprocket to see that it runs true. If bent, replace.
4. During reassembly, make sure that sprocket and sprocket seat are clean. Tighten the securing nuts in a crisscross pattern.
Bend the tabs of the lock washers fully against the securing nut flats.
Driven sprocket securing nut torque: 6.2 m-kg (45.0 ft-lb)
C. Chain inspection
1. With the chain installed on the motorcycle, excessive wear may be roughly determined by attempting to pull the chain away from the rear sprocket. If the chain will lift away more than one-half the length of the sprocket teeth, remove and inspect.
If any portion of the chain shows signs of damage, or if either sprocket shows signs of excessive wear, remove the inspect.
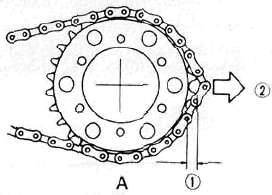
2. Check the chain for stiffness. Hold as illustrated. If stiff, soak in solvent solution, clean with wire brush, dry with high pressure air. Oil chain thoroughly and attempt to work out kinks. If still stiff, replace chain.
3. Check the side plate for damage. Check to see if excessive play exists in pins and rollers. Check for damaged rollers. Replace as required.
D. Chain maintenance
The chain should be lubricated according to the recommendations given in the General Maintenance/Lubrication charts, or more often if possible. (Preferably after every use.)
1. Wipe off dirt with shop rag. If accumulation is severe, use wire brush, than rag.
2. Apply lubricant between roller and side plates on both inside and outside of chain. Don't skip a portion as this will cause uneven wear. Apply thoroughly. Wipe off excess.
Recommended lubricant:
Yamaha Chain and Cable Lube or SAE 10W/30 motor oil.
3. Periodically, remove the chain. Wipe and/or brush excess dirt off. Blow off with high pressure air.
4. Soap chain in solvent, brushing off remaining dirt. Dry with high pressure air. Lubricate thoroughly to make sure lubricant penetrates. Wipe off excess. Reinstall.
- Printer-friendly version
- Log in to post comments