Emergency Roadside Guidectomy
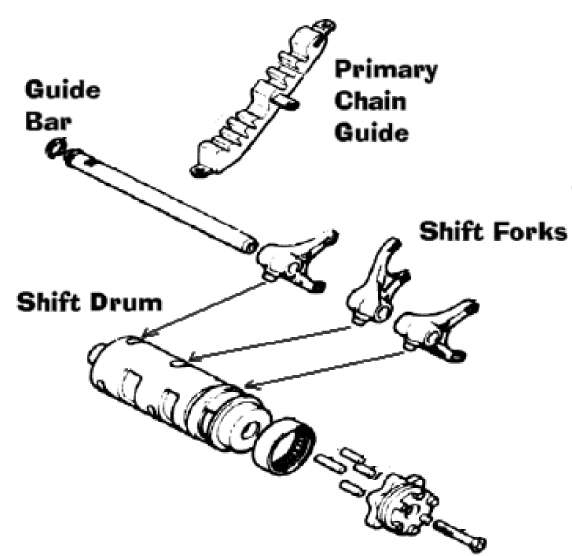
Pins of forks engage grooves of drum
The drum is rotated by the shift lever. Grooves in the drum slide the forks from side to side along the bar When a piece of the primary chain guide breaks off it may fall down onto the shifter drum, catching in one of the grooves, jamming the drum and preventing further rotation. Usually this leaves the bike stuck in first gear.
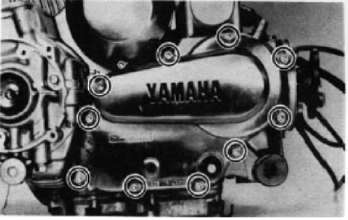
Remove shift lever assembly. Details vary between Seca and Maxim models. Remove cover bolts [circled).
1. Shift lever assembly 2. Shift shaft assembly
Tools required for emergency guidectomy:
10mm wrench.
5mm Allen key
flashlight
long pointy thing (eg: dental pick or mechanic's pick) or long thin needlenose pliers or forceps
sharpened flat bladed screwdriver.
tube of RTV silicone sealant (smurf snot.)
small hammer (or rock or whatever)
coat
latex gloves (optional)
Procedure:
Find something (like a guardrail) to lean the bike on the right side. You want it leaning at about the same angle as if the sidestand was on the right side to prevent loss of engine oil. Drape coat over guardrail (or whatever) to protect bike. Remove shifter lever with 10 mm wrench. You may have to gently spread the split with a screwdriver. On Seca models, use screwdriver to pop out e-clip from pivot pin but be careful not to launch it across the road! Remove shifter cover bolts with Allen key. Lay them out in order or at least take careful note of where the long ones came from. That applies to the retainer for the pickup wiring too.
Don gloves to keep hands clean. Remove shifter cover. Try not to damage the gasket, but you probably will. The cover may be a bit stubborn. Try rapping it firmly around the perimeter with the handle of the screwdriver. If you still can't get it to budge then place the tip of the screwdriver or a utility knife blade or similar thin wedge into the gasket between the cover and the case and gently tap with the hammer (or whatever). Don't go too far in at first, work your way around as much of the edge as possible so as to draw it off evenly. Avoid twisting motions but a little gentle levering is ok on the second and subsequent passes. The holes the long bolts came out of also contain hollow locating dowels that the bolts pass through -- those will probably be the stiffest points.
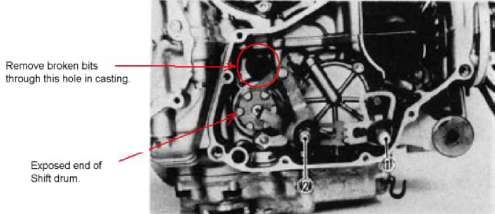
Once the cover is off, look for a small hole, about the diameter of a nickel, in the casting slightly above and left of the shifter drum. Using the light, locate the pieces of rubber from on top of the shift drum. Using the pointy thing, pick the pieces of rubber out of the transmission through the hole. This is not quite as easy as it sounds -- the hole is tiny and the inside is dark. Under sunny skies it might be helpful to drape a second coat over your head and engine to shade things and let your eyes adjust but the rubber bits are black and oily and so is everything else so you will be working by feel much of the time.
Some of the pieces may well be too big to fit through the hole. Sharpen the tip of your screwdriver using the pavement, flat rock or concrete bridgework. Work the pieces over to the opposite side of the transmission. Using the opposite casting as an anvil, force the sharpened tip of the screwdriver into the larger bits, cutting them down to size. You may have to tap the screwdriver handle with your hammer (or whatever) but don't get carried away with the force -- that's only aluminium backing things up. If it doesn't want to cut then take a smaller bite, chipping away at the edges. Pick the pieces out as you go. Don't worry if small bits fall through the gears -- they will fall right down into the oil sump and stay there. The oil pump has an intake screen preventing them from getting sucked in.
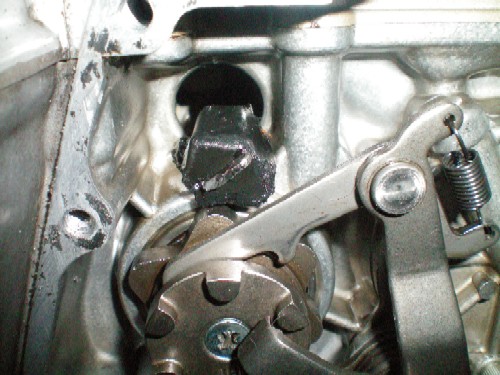
The pointy thing is my favourite weapon for removing bits because anything else takes up space in the hole, reducing the size of the largest piece you can pull through. A pointy thing can simply be poked into the middle of a piece like a skewer. Make sure you get all the pieces out. It's a good idea to slide the shifter onto the shaft temporarily and rotate the drum so you can carefully examine the grooves and ensure it rotates again. After all, it was a bit of rubber in one of those grooves that drew your attention in the first place.
When you are satisfied, remove the shift lever and carefully pick out any debris from the shifter side of the hole. Apply a thin layer of smurf snot (ie: RTV silicone sealant -- usually blue) to the cover mating surface. Don't bother to try to clean off the old gasket at this time. Just plaster over whatever is left with the smurf snot. Remove the glove you used to smear the RTV to avoid getting blue fingerprints all over the cover. Install the cover. It may be necessary to gently tap it home in the area of those dowel pins. The handle of the screwdriver can be used to soften the blows rather than applying the hammer (or whatever) directly to the aluminium casting. Reinstall the bolts and snug them up, but don't get silly with them. Remember the torque on those is down around 7.2 ft-lbs. Reinstall the shifter lever. On Seca models remember that the linkage goes on the top and carefully press the e-clip home in it's groove with the flat edge of your screwdriver.
This is a temporary fix. For one thing, it is possible that more pieces will fall from the guide and you will have to do it again in a few hundred miles. However, the ends of the guide are well secured and there is no way the chain can contact the casting to do damage. I know of one case where the bike was ridden an additional 40,000 kms before the broken guide was changed, with no ill effects.
tafn
dv