The Art of Keeping Warm and Dry at 100kph. Dwayne Verhey
Unless you're lucky enough to live between the tropics, extending the riding season means you're going to get cold, and probably wet. Now that isn't near as much fun, and many people park the bike when the thermometer dips. Others of us aren't willing to give up the freedom of two wheels just yet, and we have a choice: freeze in the wet or take actions to protect ourselves -- both from the elements and the possible consequences of riding in traffic with stiff, slow muscles.
The most important piece of cold-weather riding equipment is the rider. You should be well rested and properly fed. Protein will help keep you warmer while sitting on the bike than carbohydrates (even though they generally contain the same number of calories per gram) because of the way they are processed by the body. Fats contain lots of calories, but don't help much when you're just sitting there. Avoid caffeine and alcohol. Caffeine because it's a diuretic, and there's nothing worse than riding in the cold when you have to, well, go. Alcohol, because it will actually lower your body temperature and make you colder even if you temporarily feel warmer after a drink. Caffeine can be found in the obvious places like coffee and tea, but also in virtually any dark soft drink and many over-the-counter medications. I'm sure you know where you can find some alcohol ;-)
Next is the clothing. We can take our cue from the snowmobilers, after all they face many of the same challenges: cold weather in a potentially damp environment with a high speed windchill factor and a helmet. When dressing for the cold, wear multiple layers, starting with appropriate underwear. Even in the cold your body will perspire slightly. Cotton may be comfy against your skin but it will hold moisture and make you feel cold. Wool will wick the moisture from the skin, keeping you dry, and both still provide some insulation even when wet, but wool irritates many people's skin. Polypropylene is a good alternative, combining the comfort of cotton and the warmth of wool. Underwear, in this case, includes long johns and a t-shirt. I like to put the long johns over my first layer of socks, so when I put on my wool socks, the joint is overlapped. That brings us to the next layer(s). Wool is definitely a great option here, but there are some good polyester fleece garments out there now. The "Sudbury Dinner Jacket" is one of my personal favourites, even if I do look like Red Green when I get there. The smooth polyester lining and quilted interlining makes them very comfortable and warm. Over that goes my wool sweater, and the winter liner of my coat.
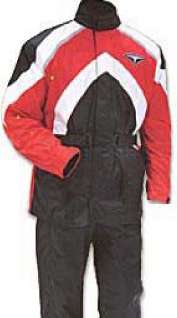
Finally are the protective layers. They must block the wind and the rain and save the rider from roadrash in case of a spill. I like leather, but it's not really waterproof in a downpour. Similarly, a rainsuit is excellent protection from the wind and rain, but not much defence against road rash. Joe Rocket's Ballistic series coats and pants are good defense against all three according to my youngest two children. Waterproof on the highway at speed, warm and windproof with the liner zipped in and the vents closed, and they rate very well in abrasion tests. (There may well be other brands just as good, I'm just not familiar with them.) I settle for wearing my rainsuit over my leathers. In a slide, the rainsuit might be damaged, but the leather will protect me. For very cold conditions, I wear a one-piece snowmobile suit over my leathers. I prefer the one piece over the two piece style -- the wind can't pull up on the coat and whistle around my waist. It's important to note that my outer layers are oversized. Tight clothing may be more fashionable, but loose clothing is warmer, especially with extra layers underneath. My rainsuit is large enough to go over the snowmobile suit too.
A word about rain suits. A plastic garbage bag with head and arm holes cut in it doesn't quite make the grade (don't ask me how I know this!). I've used cheap plastic suits and better quality yachting suits. Neither works as well as a middle of the road motorcycle rain suit. Things to look for include velcro closures at wrists, ankles neck and waist, as well as over all zippers. Make sure you can don it quickly. Pant legs should have a wide opening so as to fit over boots (who wants to take their boots off when caught in a sudden downpour?) There should be a large overlap at the waist, and avoid anything with a fly in the pants. Venting in the jacket is a good idea but any venting should be in the back, with a substantial velcro closure. Bright colours and reflective taping is a good idea at any time but especially when visibility is poor. And keep it with you at all times. The odds of running into rain increase exponetially if you don't have a rainsuit handy -- even if the forcast calls for 0% chance of rain today and you're driving through the Sahara Desert. ;-) And in case of a sudden cold snap, the rain suit at least blocks the wind
Your feet are going to get cold. You're just sitting there riding, and they're hanging out in the wind and rain. Proper boots are important. In moderately cold weather, a pair of wool socks inside your waterproof riding boots will suffice, but when the mercury drops much below freezing, nothing beats a warm pair of snowmobile boots. They're waterproof -- better than motorcycle boots because snowmobilers spend a certain amount of time digging their machines out of half-frozen slush -- and come with a thick felt liner that's very warm. Hands are another problem. Sure, you can wear multiple layers of gloves, but the need to operate turn signals, brake levers and such limits how many layers you can wear. Snowmobile mitts are the obvious choice. Mitts tend to be warmer than gloves anyway, because the fingers can keep each other warm. Good snowmobile mitts are windproof with high gauntlet cuffs and have abrasion resistant palms and armoured backs because, well, sometimes snowmobilers fall off too. However, many people don't feel comfortable riding in mittens. If you're going to wear gloves, get an oversize pair of 'Thinsulate' motorcycle gauntlets, and wear a pair of inner gloves as well when the temperature dips
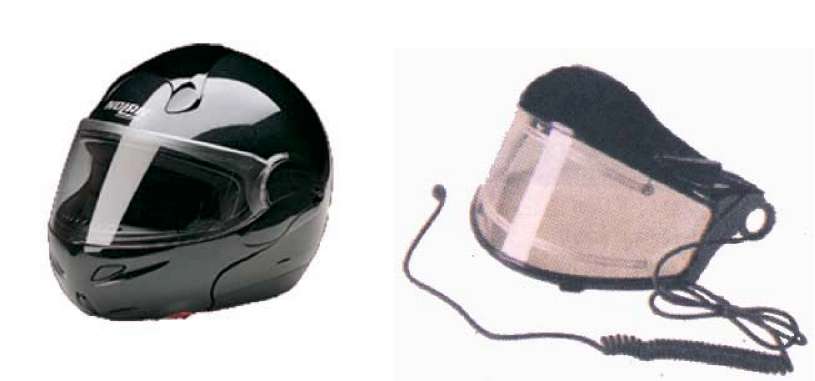
Finally is the head and neck. Many motorcycle coats or snowmobile suits will close high on the neck, but a scarf, balaclava, or gaiter will keep the underside of your chin warm. I strongly recommend a full-face helmet for cold weather riding. This is one time you don't want to feel the wind in your face. The biggest problem with the helmet is visor fogging. At highway speeds, there will probably be enough air movement to carry your warm, moist breath away, but in town a good helmet is too well sealed with the vents closed. Anti-fog coatings and sprays will help somewhat, but are not perfect. Snowmobilers use special double visors or electric visors coupled with breath deflectors to keep their visors clear. Electric visors either have the disadvantage of wires in front of your face, or the elements are off to the edges where they don't really work all that well. Double visors work well unless they get moisture between them -- in which case they'll fog up and stay fogged.
I like the visor liner system. It's a factory option for my Nolan, but universal fit ones are available to fit virtually any helmet. It works well, trapped moisture can escape and there's one less wire between me and the bike. Which brings us to the next level of warmth: electric clothes.
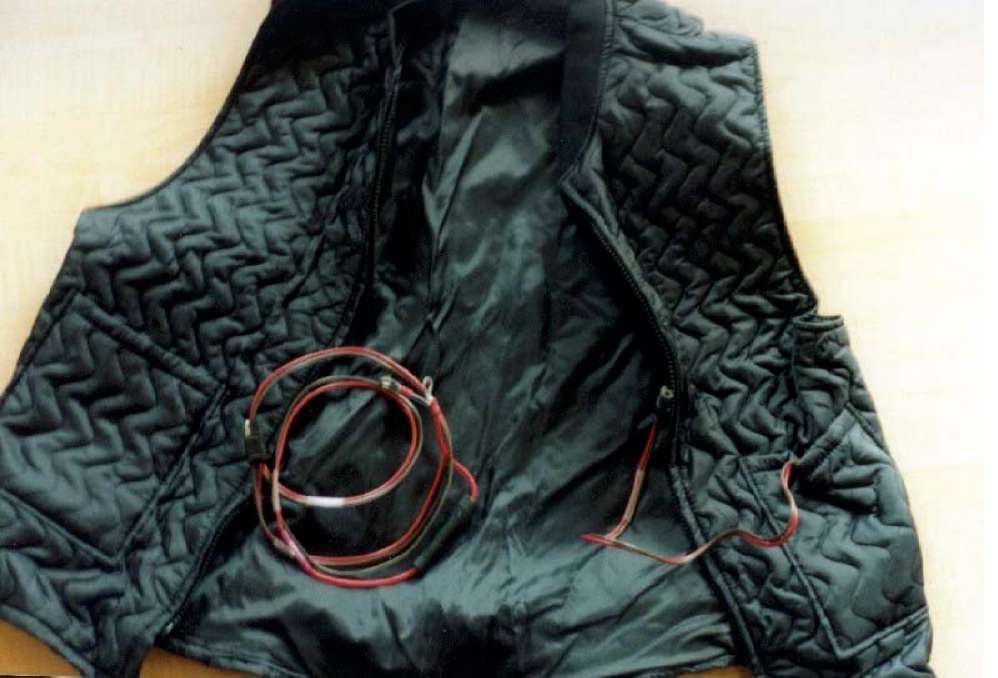
This is an electric vest -- the entry level of heated riding suits. For about CDN$150 you too can be warm as toast for hours on end. The wire on the left connects to the bike's battery through the supplied in-line fuse in about 5 minutes, and the common 2 pole car trailer-type connector connects you to your bike when you're ready to ride. The drain on the electrical system is less than 3 amps -- well within the tolerance of the XJ alternator. It's worn over your t-shirt for maximum warmth and comfort, but it can be worn over the sweater on days when less heat is called for. I purchased a pair of extra connectors at the local auto parts supply and made a short extension cord that passes through a button hole I put inside the pocket of my one piece snowmobile suit, for those really cold days.
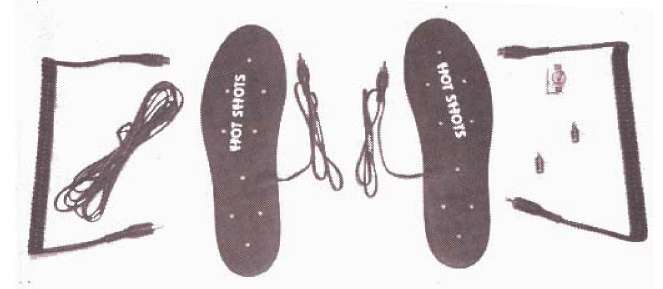
Gloves, insoles, sleeved jackets and even entire riding suits are also available, but this baby alone is very effective in keeping my torso warm.
The electric vest unfortunately does nothing for the hands and after a few hours on the highway, the cold penetr snowmobile mitts over thinsulate inner gloves.
Those with a throttle lock can alternately warm their hands on the cylinder head, but that's less than comfortable and not particularly safe. Electrically heated gloves are available (and perhaps the ultimate in comfort), but they are very expensive and involve loose wires running all over -- if you remembered to pack them. Electrically heated grips are compromise. They can be purchased as heater elements or complete grips. They have the distinct advantage of always being with the bike (conversely, they are not readily transferable between bikes). If you go this route, make sure the set you buy was designed for motorcycles -- the throttle grip has a slightly larger diameter hole. Snowmobiles don't have a twist-grip throttle, so the right hand grip won't work on a motorcycle.
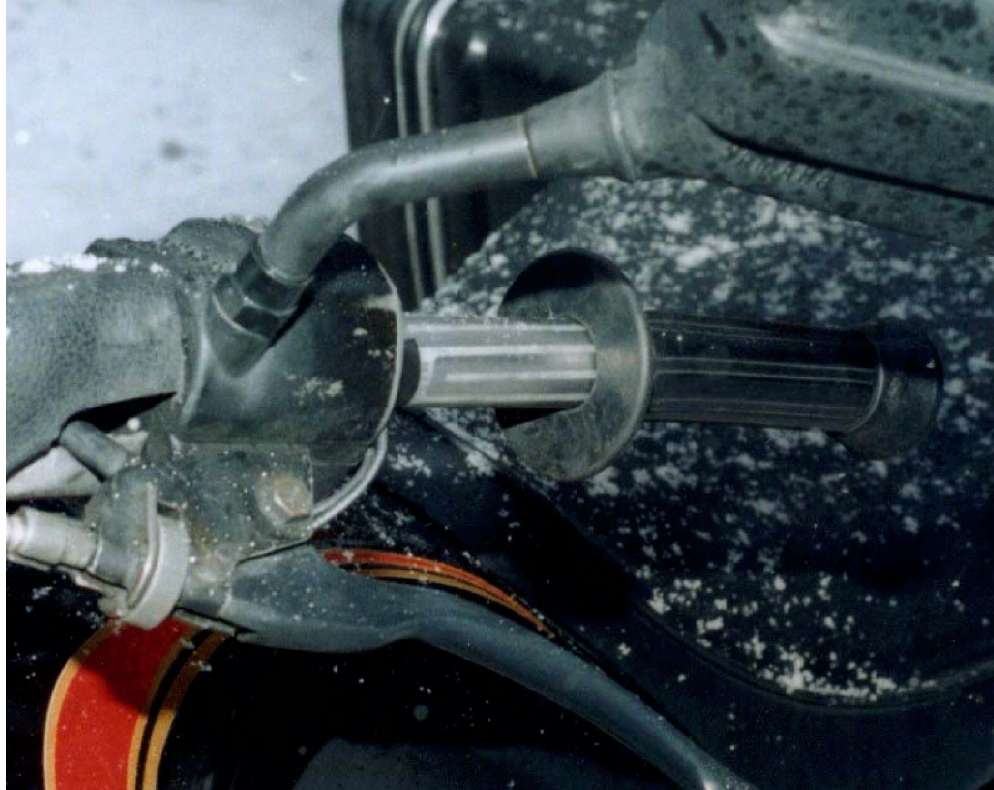
I liked the stock grips, so I went with the mylar grip heaters, shown above. They have a self-adhesive back and install under the existing grip. For the throttle side, I had to peel the rubber grip off the plastic insert and install the heater between the grip and the plastic. Installing it on the bar itself made the throttle bind. Leave enough of a loop in the wires on that side so the throttle can be rotated fully. The current draw is about 1.6 amps.
Now, as much as I like my electric vest, there are times when it can get too hot. Ok, I can unplug it or put it on over my sweater, but hey, then I'd have to stop. You can buy an accessory thermostatic control but they want CDN$50 for the silly thing.
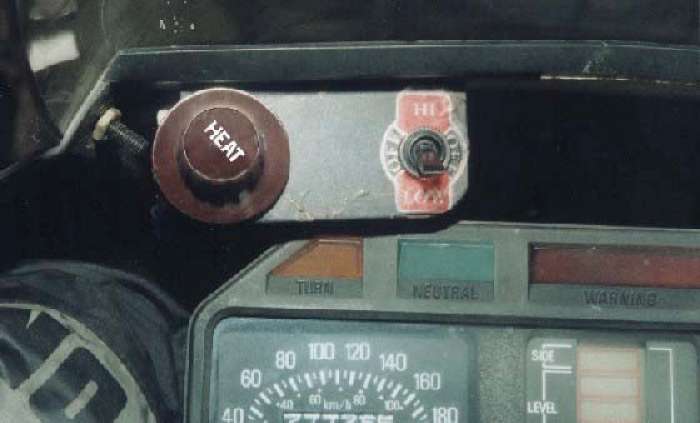
My solution? The knob on the left is a twelve dollar 4 position universal heater fan control from the local auto parts store. Rated 5 amps with Off-High-Medium-Low. I just wired mine to ground the vest, but if you ground the switch itself and control the positive feed to the vest, there's a little light bulb in the knob that illuminates it at night. The heater control actually comes with a clamp-on mounting plate, but I discarded it in favour of one for mounting both switches. Works great and the large knob can be worked with heavy gauntlets or snowmobile mitts.
Beside it is the two position switch that came with the grip heaters. The Low setting shunts a power resistor in series with the grips to cut down the current, while High feeds it full power. My Seca alternator has no problems running the vest, grips and 100 watt foglight all at the same time.
Spoiled or what, eh?

One last neat little piece of hardware. Called the 'HyperSwipe', it attaches around your gauntlet wrist with a velcro strap, providing a windshield wiper for those days it isn't raining quite hard enough to sheet across your visor. Some snowmobile mitts come with a similar squeegee built right in.
You will need to mount a control of some sort to regulate the heat. The first issue is figuring out where to mount it. You can use the switch and resistor that comes with them, giving you a high-off-low capability. On Jasper, I used a plastic project box from Radio Shack. I think the internal dimensions were 3" x 2" x 1". It was just barely large enough to cram in the resistor and wire the switch. I drilled a hole in the back and mounted the box by removing the pinch bolt from the upper triple tree and passing it through the box with a washer on each side. I drilled a hold in the side for the switch and one in the bottom for the wires. I used plastic wire loom (1/4" from Princess Auto) to protect all the wires. I ran the wires from the switch box and from each grip into the headlamp shell and made all the connections in there.
On SWMBO's bike, I did things slightly differently. I discarded the switch and resistor that came with the kit and used a Double Pole, Double Throw (DPDT) switch to wire them. The circuit (shown as option 2 in the attached drawings) configures them in series for low, eliminating the need for a resistor. This draws slightly less current from the bike when used on low because none is wasted heating up a resistor. Again, I used a little project box to mount the switch but I used a bracket to mount it to the steering head because it would hit the tank if I tried to mount it like on Jasper. Because there was no resistor in the box, I had enough room to make all the connections inside the switch box.
Now, the third option is actually my preferred solution and what I am using for the vest on my Seca and the grips and vest on my FJR. The 4 position rotary heater switch by Niehoff (UN20010). Available from Canadian Tire as part number 020-6337-6. The biggest problem might be getting one. Canadian Tire's computer system calls it a "Headlight Switch" for some unknown reason -- probably an error by whoever typed it in in the first place -- and many stores were out of stock last fall when I was looking for another. I don't know but I fear they may be deleting it from inventory, although they all said they were just backordered.
Anyway, this switch gives you Off, High, Medium, Low capability. And the knob is illuminated at night. The extra heat setting is great -- on long rides I found just having High and Low settings was not flexible enough. I was often flipping back and forth between the two because High was too hot and Low wasn't enough. The rotary switch is simple to wire as there are only two screw terminals -- the resistor is attached to the back of the switch. The only exception is that the switch must be grounded for the light to work. Not a problem if you are using the supplied bracket to hang it from the underside of a metal car dash. In my case, I was mounting it to a plastic motorcycle fairing. The first one I did, on the Seca, I soldered a ground wire to the switch. It works, but is inelegant. When I got to the FJR, I decided to cut down the supplied bracket with a dremel tool, forming it into a little tab that I could attach a female spade connector to.
If you have a grounded metal surface that you can attach it to with the supplied bracket, then you are all set. If you decide to mount it in some sort of project box then you will need a metal box or you will need to figure out a ground system for the switch. BTW: you will probably need a deeper box for this switch -- I don't think it will fit in anything less than 1 1\2" deep. One other point about this switch: If you connect the power to the terminal marked "B" (for battery) then the light will be on full power all the time. Easier to find at night. If you reverse the connections and connect the grips to "B" and the power to the other screw, the grips will still work just fine and the light will change intensity depending on setting -- IE the light will be off on "Off", brightest on "High", dimmer on "Medium" and dimmest on "Low". If you accidentally set the knob between two settings, the light will be off. I have it the first way on the FJR ('cause the knobs are located in an awkward spot and can be harder to find) and the second way on the Seca ('cause the knob is easy to find, up in my normal line of vision).
In all cases, use power from a switched, fused source. You don't want to connect direct to the battery because the grips will drain it down if you ever forget to turn them off or if kids decide to play with the switch. If you have one of Ross' fuse boxes, they come with an extra fuse terminal that is perfect for adding heated grips. Another possibility is the running lights connector inside the headlamp shell. Also, don't forget about what I said regarding wrapping the wire around the bars (or inner plastic grips if you choose to put the heaters under the foam) once. This will prevent strain from ripping the wires out of the heaters. Similarly, make sure you leave a decent amount of slack on the throttle side so that the wire is not tightly bent or pulled when the throttle is rotated.
One last comment: if you like “Buffalo” style grips with the foam rubber covers over the plastic core, I would suggest installing the heater elements between the foam and the plastic. The chrome end caps are screwed on from the inside, so you would have to remove the grip to access the screw head, but you have to remove the grips one way or the other. Once the caps are removed, the foam will slide off the end and you can install the heaters and replace the foam. The huge advantage of doing it this way is the insulation value of the plastic part of the grip to the bar -- less heat will be lost to the metal handlebars.
tafn Dwayne


OPTION 1. Using supplied switch and resistor. Advantage: simple and all parts supplied in kit.
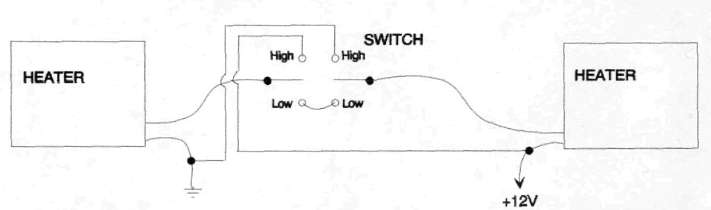
OPTION 2, Buy new DPDT switch and delete resistor. Advantage: less power use on Low setting.
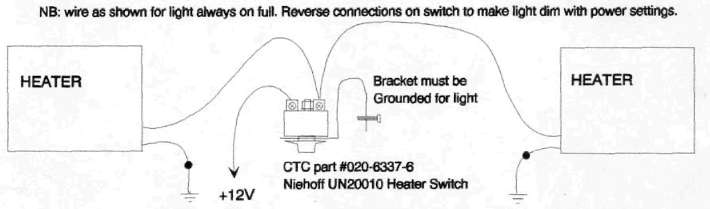
OPTION 3, Buy new rotary switch. Advantage: 4 position (Off. High, Med, Low) and built in resistor. Illuminated knob for night use. Comes with bracket (may not need project box), Very simple to wire.