Engine oil level measurement
1. Place the motorcycle on its centerstand. Warm up the engine for several minutes.
NOTE:
Be sure the motorcycle is positioned straight up when checking the oil level; a slight tilt toward the side can produce false readings.
2. With the engine stopped, check the oil level through the level window located at the lower part of the right side crankcase cover.
NOTE:
Wait a few minutes until the oil level settles before checking.
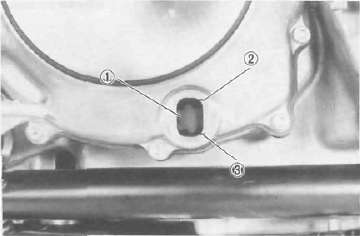
1. Level window 2. Maximum mark 3. Minimum mark
3. The oil level should be between maximum level and minimum marks. If the level is lower, add sufficient oil to raise it to the proper level.
Engine oil and oil filter replacement
1. Start the engine and stop it after a few minutes of warm-up.
2. Place an oil pan under the engine and remove the oil filler cap.
3. Remove the drain plug and drain the oil.
4. Remove the #2 exhaust pipe.
5. Remove the oil filter bolt and filter element.
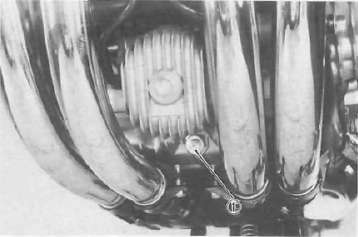
1. Drain plug
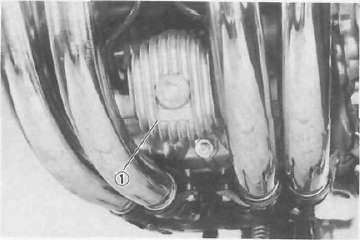
1. Oil filter cover
6. Reinstall the drain plug (make sure it is tight).
Drain plug torque: 43 Nm (4.3 m-kg, 31 ft lb)
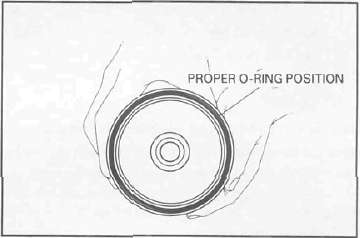
7. Install the new oil filter element new CD-ring and filter cover; tighten the oil filter bolt.
Oil filter bolt torque:
15 Nm (1.5 m-kg, 11 ft-lb)
NOTE:
Make sure the O-ring is positioned properly.
8. Install the #2 exhaust pipe.
Tightening torque: 8 Nm (0.8 m-kg, 5.8 ft-lb)
9. Add oil through the oil filler hole.
|
Periodic oil change: |
|
2.5 L (2.2 Imp qt 2.6 US qt) |
|
With oil filter replacement: |
|
2.8 L (2.5 Imp qt, 3.0 US qt) |
|
Recommended oil: |
|
SAE 20W40 type SE motor oil SAE 10W30 type
|
CAUTION:
Take care not to allow foreign material to enter the crankcase.
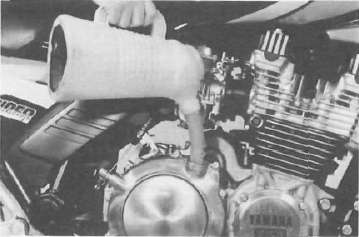
10. After replacement of the engine oil, and/ or oil filter, be sure to check for oil leakage. The oil level indicator light should go off after the oil is filled.
CAUTION:
If the indicator light flickers or remains on, the oil level switch may be damaged. Refer to "CHAPTER 6" for corrective action.
Final gear oil level measurement
1. Place the motorcycle on a level place and place it on the centerstand. The engine should be cool (at atmospheric temperature).
2. Remove the oil filler cap and check the oil level whether it is to the hole brim. If it is not up to this level, replenish oil.
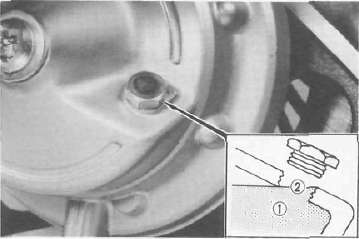
1. Final gear oil 2. Correct oil level
CAUTION:
Take care not to allow foreign material to enter the final gear case.
Final gear oil replacement
1. Place an oil pan under the final gear case.
2. Remove the final gear oil filler cap and the drain plug, and drain the oil.
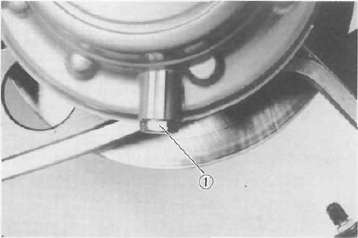
1. Final gear drain plug
3. Reinstall and tighten the final gear drain plug.
4. Fill the gear case to the specified level.
Oil capacity:
Final gear case:
0.2 L (0.18 Imp qt, 0.21 US qt) Recommended oil:
SAE 80 API "GL-4" Hypoid gear oil If desired, an SAE 80W90 hypoid gear oil may be used for all conditions.
5. Reinstall the filler cap securely.
Compression pressure measurement
Insufficient compression pressure will result in performance loss and may indicate leaking valves or worn or damaged piston rings.
Procedure:
1. Make sure the valve clearance is correct
2. Warm up the engine 2—3 minutes. Stop the engine.
3. Remove the all spark plugs.
4. Install a compression check gauge.
5. Turn over the engine with the electric starter (make sure the battery is fully charged) with the throttle wide open until the pressure indicated on the gauge does not increase further.
Compression pressure (at sea level): Standard
981 kPa (10 kg/cm2, 142 psi) Minimum
785 kPa (8 kg/cm2, 114 psi) Maximum
1,177 kPa (12 kg/cm2, 171 psi)
WARNING:
When cranking the engine, ground the removal spark plug leads to prevent sparking.
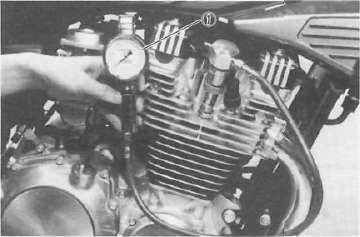
1. Compression gauge
6. If the pressure is too low, squirt a few drops of oil into the cylinder being measured. Measure compression again. If there is a higher reading than before (without oil), the piston rings may be worn or damaged. If the pressure remains the same after measuring with the oil, either or both the rings and valves may be the cause.
7. Check each cylinder. Compression pressure should not vary more than 98.1 kPa (1 kg/cm2, 14 psi) from one cylinder to any other cylinder.
- Printer-friendly version
- Log in to post comments

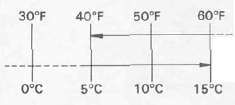 SE motor oil