SPARK PLUG
1. Remove:
• Spark plug(s)
2. Inspect:
• Electrode (1) Wear/Damage — Replace.
• Insulator color (2)
3. Measure:
• Plug gap (3)
Use a Wire Gauge or Feeler Gauge. Out of specification — Regap.

0.7 ~ 0.8 mm (0.028 - 0.31 in)
Clean the plug with a spark plug cleaner if necessary-
Standard Spark Plug: BP8 ES (NGK) W24EP-U (NIPPONDENSO)
Before installing a spark plug, clean the gasket surface and plug surface.
4. Tighten:
• Spark plug(s)
20 Nm (2.0 mkg, 14ftlb)
NOTE:
Finger-tighten the spark plug(s) before torquing to specification.
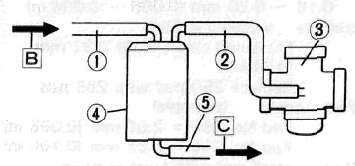
CANISTER (For California Only)
This model is equipped with a canister to prevent the discharging of fuel vapor into the atmosphere.
1. Inspect:
• Hoses (1) (2) (5) Cracks/Damage — Replace. Clog - Clean.
• Canister (4) Cracks/Damage — Replace.
3 Carburetor [B] From fuel tank [C] To atmosphere
A EMISSION HOSE ROUTING
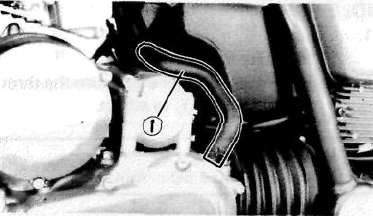
CRANKCASE VENTILATION SYSTEM
1. Inspect:
• Crankcase ventilation hose ® Cracks/Damage — Replace.
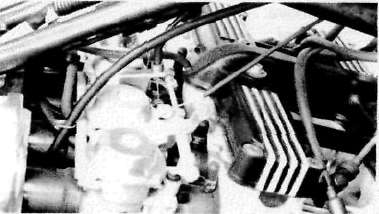
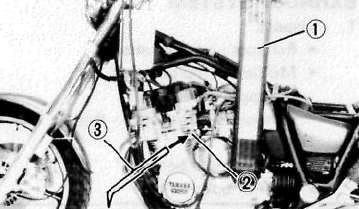
FUEL LINE
1. Inspect:
• Fuel hose (1)
• Vacuum hose (2) Cracks/Damage — Replace.

INTAKE MANIFOLD
1. Tighten:
• Carburetor clamps
• Carburetor joint bolts
2. Inspect:
• Carburetor joint
• Gaskets Cracks/Damage — Replace.
EXHAUST SYSTEM
1. Inspect:
• Exhaust pipe gasket(s) (1)
• Muffler clamp gasket(s) (2) Damage — Replace. Exhaust gas leakage — Repair.
2. Tighten:
• Exhaust pipe bolts
• Muffler bolts
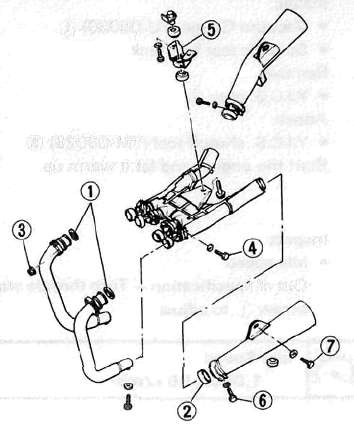
Exhaust Pipe Flange (3) :
10 Nm (1.0 m-kg, 7.2ft-lb)
Exhaust Pipe Clamp (4) :
20 Nm (2.0 m-kg, 14ftlb)
Muffler Bracket (5) :
25 Nm (2.5 m-kg, 18 ft-lb)
Exhaust Chamber Mount (7) :
20 Nm (2.0 m-kg, 14 ft-lb)
Muffler Clamp (6) :
20 Nm (2.0 m-kg, 1 4 ft-lb)
IDLE SPEED/CARBURETOR SYNCHRONIZATION
IDLE SPEED
1. Adjust
• Idle speed
Warm up the engine and turn the throttle stop screw (1) to adjust.
Idle Speed
1,050 + 50 r/min
Carburetor Adjustment.
Carburetors must be adjusted to open and close simultaneously.
NOTE:
Valve clearance must be set properly before synchronizing the carburetors.
1. Remove:
• Seat
• Fuel tank
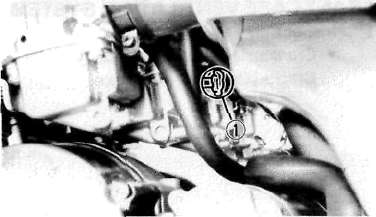
2. Disconnect:
• Vacuum plugs (1)
• Vacuum hose (2)

3. Install:
• Vacuum Gauge (YU-08030) (1)
• Suitable test fuel tank
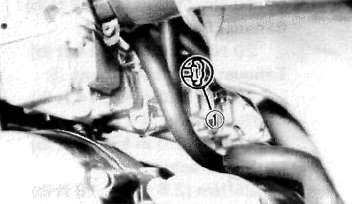
4. Remove:
• Y.I.C.S. plug (2)
5. Attach:
• Y.I.C.S. shutoff tool (YM-08025) (3)
6. Start the engine and let it warm up.
7. Inspect:
• Idle speed
Out of specification — Turn throttle stop screw (1) to adjust.
Idle Speed
1,050 ±50 r/min
8. Adjust:
• Carburetor synchronization
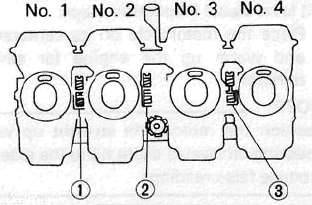
Carburetor synchronization adjustment steps:
• Synchronize the carburetor No. 1 to the carburetor No. 2 by turning the synchronizing screw (1) until the both gauge readings are the same.
• Rev. the engine for a fraction of a second, two or three times, and check the synchronization again.
Vacuum Pressure at Idle Speed:
23.99 kPa (180 mm Hg, 7.09 in Hg)
Vacuum Synchronous Difference:
0.67 kPa (5 mm Hg, 0.2 in Hg)
• Repeat the above steps to synchronize the carburetor No. 4 to the carburetor No. 3 by turning the synchronizing screw (3) until the both gauge readings are the same.
• Repeat the same steps to synchronize No. 3 carburetor to No. 1 carburetor, then turn synchronizing screw (2) until both gauge readings are the same.
- Printer-friendly version
- Log in to post comments