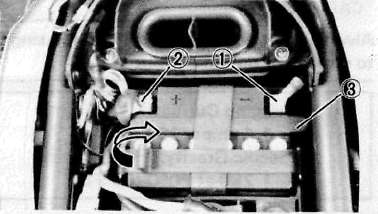
BATTERY
1. Disconnect:
• Negative lead (1)
• Positive lead (2)
• Breather hose (3)
2. Pull:
• Battery
3. Check:
• Fluid level
Incorrect — Refill.
Fluid level should be between upper (1) and lower (2) level marks.
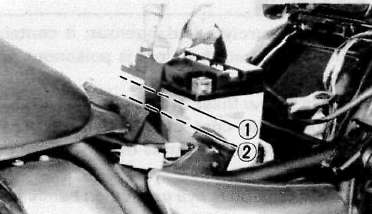
Refill with distilled water only; tap water contains minerals harmful to a battery.
2. Connect:
• Breather hose
Be sure the hose is properly attached and routed.
3. Inspect:
• Breather hose Obstruction — Remove. Damage — Replace.
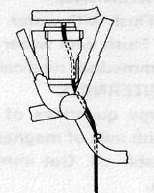
HOW TO ROUTE BATTERY BREATHER PIPE.
CAUTION:
Always charge a new battery before using it to ensure maximum performance.
Charging Current: 1.4 amps/10 hrs
Specific Gravity: 1.280 at 20°C(68°F)
Battery electrolyte is dangerous; it contains sulfuric acid and therefore is poisonous and highly caustic. Always follow these preventive measure:
• Avoid bodily contact with electrolyte as it can cause severe burns or permanent eye injury.
• Wear protective eye gear when handling or working near batteries.
Antidote (EXTERNAL):
• SKIN — Flush with water.
• EYES — Flush with water for 15 minutes and get immediate medical attention.
Antidote (INTERNAL):
• Drink large quantities of water or milk follow with milk of magnesia) beaten egg, or vegetable oil. Get immediate medical attention.
Batteries also generate explosive hydrogen gas, therefore, you should always follow these preventive measures:
• Charge batteries in a well-ventilated area.
• Keep batteries away from fire, sparks, or open flames (e.g., welding equipment, lighted cigarettes, etc.)
• DO NOT SMOKE when charging or handling batteries.
KEEP BATTERIES AND ELECTROLYTE OUT OF REACH OF CHILDREN.
HEADLIGHT
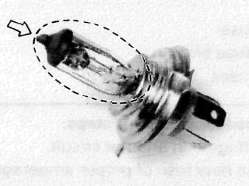
Headlight Bulb Replacement
1. Remove:
• Securing screws (1) (from light unit assembly/headlight body.)
2. Disconnect:
• Lead wire
3. Remove:
• Light unit assembly
4. Rotate:
• Bulb holder (1) Turn it counterclockwise.
5. Remove:
• Defective bulb

6. Install:
• Bulb (New)
Secure with bulb holder.
• Avoid touching glass part of bulb.
• Keep the bulb free from oil otherwise, transparency of glass, bulb life, and illumi-nous flux will be adversely affected.
• If oil gets on bulb, clean it with a cloth moistened thoroughly with alcohol or lacquer thinner.
Do not touch the headlight bulb when it is on, as the bulb generates enormous heat; keep flammable objects away.
7. Install:
• Light unit assembly (to headlight body.)
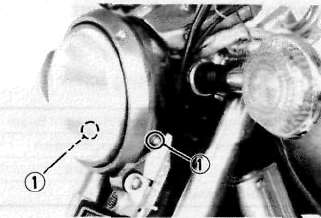
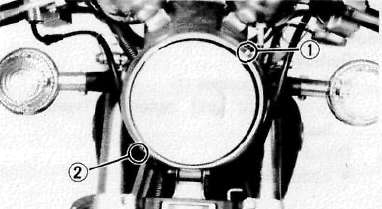
Headlight Beam Adjustment
Horizontal adjustment:
1. Rotate:
• Horizontal adjusting screw (1)
|
Horizontal Adjustment of Headlight Beam |
|
|
Adjusting screw |
Beam direction |
|
Turn clockwise |
- to Right |
|
Turn counterclockwise |
- to Left |
Vertical adjustment:
1. Rotate:
• Vertical adjusting screw (2)
|
Vertical Adjustment of Headlight Beam |
|
|
Adjusting screw |
Beam direction |
|
Turn clockwise |
1 to Raise |
|
Turn counterclockwise |
1 to Lower |
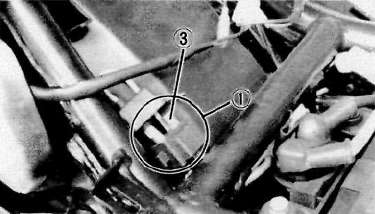
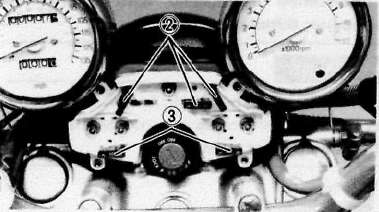
FUSE
The fuse box is under the indicator light panel. The main fuse is under the seat.
(1) Main fuse
(2) Other fuse block
(3) Spare fuses
Blown fuse replacement steps.
• Turn off ignition and the circuit.
• Install a new fuse of proper amperage.
• Turn on switches to verify operation of electrical device.
• If fuse blows immediately again, check circuit in question.
Do not use fuses of higher amperage rating than recommended. Extensive electrical system damage and fire could result from substitution of a fuse of improper amperage.
- Printer-friendly version
- Log in to post comments