INTRODUCTION
The Yamaha turbo system is made up of three basic systems: the fuel system, the intake system and the exhaust system. These systems work together to Increase the performance and efficiency of the engine.
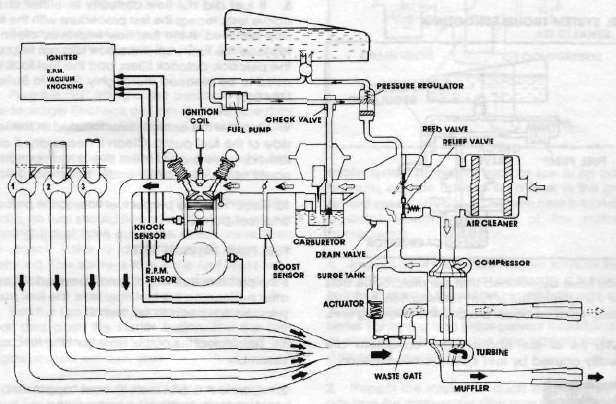
The fuel system must provide fuel to the carburetors under normal operation as well as during boost operation. Due to the precision nature of many components in the turbo system, it is imperative that the fuel tank, fuel filters and carburetors be completely free of rust, fuel residue and other contaminants.
The intake system allows the engine to draw clean air through the air cleaner at low speeds, and forces pressurized air from the turbocharger compressor to the engine. This system must be free of pressure leaks to perform its function properly.
The exhaust system drives the turbocharger turbine. The exhaust joints should be tight to prevent exhaust pressure leakage, and the turbocharger must function properly.
Since these three systems are interdependent a problem with any one or more components in any of the three systems can cause a performance problem with the entire turbo system.
VERIFY THE PROBLEM
Diagnosing performance problems requires that you first determine the cause of the problem by verifying the symptoms. Usually, performance problems fall into three categories: the motorcycle acts like It Is running out of fuel, it overflows fuel (runs rich), or it runs poorly while on boost. By using customer information, a comprehensive test ride and a logical troubleshooting procedure, you should be able to locate and correct the problem quickly and easily.
Normally, fuel overflow is due to a check valve which is stuck open or a pressure regulator which Is stuck closed. Fuel overflow can also be caused by a clogged petcock filter. Also be certain that the carburetors are properly cleaned, that the needle valves seal properly, and that the float levels are properly set.
NOTE: The proper float level specification should be 21.5 + 5mm.
Fuel system problems may also be causing high performance problems. If there is a high performance problem, look for conditions such as a plugged fuel tank cap vent or Improper carburetor adjustments in addition to the fuel system troubleshooting procedures described below.
FUEL SYSTEM TROUBLESHOOTING
If you have determined that the motorcycle acts as If It Is running out of fuel, running rich, or It runs poorly while on boost, perform the following tests.
NOTE: All of the above turbo conditions are usually caused by fuel system contamination.
This procedure requires extensive handling of gasoline. Gasoline Is extremely flammable. To avoid severe injury, do not allow open flames, sparks, cigarettes, or any other sources of Ignition near the area In which you are working.
FUEL FILTER TESTS
1. Remove the tank cover and side panels.
2. Turn the petcock valve to the "OFF" position.
3. Remove the output hose from the petcock.
4. Connect a 5/16-inch ID hose approximately two feet long to the outlet side of the petcock.
5. Place the other end of the hose in a clean drain pan.
6. Turn the petcock to the "ON" position; a normal gravity flow of fuel should be seen.
7. Turn the petcock valve to the reserve position.
Again, a normal gravity flow of fuel should be seen.
NOTE: Observe the fuel (towing Into the pan. It contaminants are present In the fuel flowing into the drain pan with the petcock In the reserve position, the entire fuel system Is most likely contaminated and will need to be clean.
8. If fuel did not flow correctly in either of the above tests, repeat the test procedure with the fuel cap removed. If the fuel flow improves, clean or replace the fuel cap If the flow did not improve the petcock, petcock litters, and the fuel tank will need to be cleaned thoroughly. Refer to Bulletin M84-016.
9. Remove the conical filter located in the inlet side of the fuel pump. Clean if necessary. If contaminants are present in this filter a lean condition could occur, especially under boost conditions.
10. Reconnect the proper fuel lines to the petcock and fuel pump.
FUEL PUMP PRESSURE TEST
If the problem that was originally verified still exists after performing the fuel filter tests, the fuel pump pressure will need to be tested.
1. Disconnect the output hose from the fuel pump assembly.
2. Connect a 5/16-inch ID hose, approximately two feet long, to the fuel pump fitting.
3. Place a graduated container, such as a Ratio Rite™ cup, underneath the hose coming from the fuel pump.
4. Turn the ignition on, place the transmission in gear and push the starter button. The engine should not turn over, but the fuel pump should operate and pump fuel.
5. The fuel pump should pump a minimum of 300cc of fuel in 15 seconds. If it does not pump enough fuel in the test the fuel pump should be replaced.
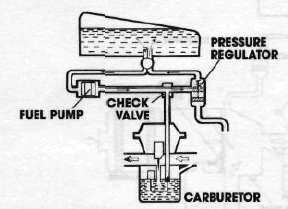
CHECK VALVE AND PRESSURE REGULATOR TEST
Again, if the problem has not been located with the above tests, proceed to test the check valve and pressure regulator.
1. Remove the fuel tank and fuel pump
2. Disconnect the lower hose from the check valve and connect a two-foot length of 5/164nch ID fuel line to the lower fitting of the check valve.
3. Connect another two-foot length of fuel line to the pressure regulator outlet fining. Run both of these fuel lines into a drain pan.
4. Reinstall the fuel pump and fuel tank and connect the fuel outlet hose to the "OUT" fitting of the petcock.
5. Plug the "IN" fitting of the petcock to prevent fuel leakage. Recheck all lines to make sure they are properly connected to avoid fuel leakage.
6. Turn the petcock to the "ON" position. No fuel should flow when the engine is not running.
7. Turn the petcock to the "RESERVE" position. Again, no fuel should flow when the engine is not running. If fuel flows out of the check valve, then the check valve is defective and should be replaced. The same is true if the fuel leaks from the pressure regulator: If It leaks, replace It.
8. Turn the Ignition on. place the transmission in gear and push the starter button. The fuel pump should operate and pump fuel but the engine should not turn over.
9. Fuel should be pumped out of the check valve outlet hose, but not from the pressure regulator. If the pressure regulator does allow fuel to flow, then It should be replaced.
10. Place a graduated container, such as a Ratio Rite™ cup, under the check valve outlet hose. Push the starter button as before and pump fuel into the container for exactly 15 seconds. The amount of fuel pumped should be at least 300ca If It is less, replace the check valve.
11. Perform this same test with the check valve outlet hose plugged closed. The output through the pressure regulator outlet hose should also be at least 300cc for 15 seconds of pumping. If it Is less, replace the pressure regulator.
INTAKE SYSTEM TROUBLESHOOTING
Intake system problems, such as low or no boost pressure, can be caused by a leak in the pressurized system. Usually, a problem here is found by a quick visual inspection of the system's components.
1. Inspect all of the exhaust system joints for leaks and tighten the clamps as necessary. It is usually helpful to remove the exhaust clamp bolts and coat the threads with anti-seize compound. This allows better tightening and helps prevent thread seizure or stripping. Also replace any gaskets that are damaged or worn.
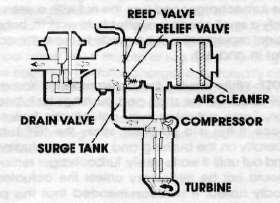
2. Inspect the intake air ducts between the air box and the compressor, and from the compressor to the surge tank. The connections of these ducts must be tight to prevent air pressure leaks, and to prevent foreign material from entering the compressor or the engine
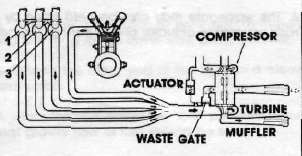
3. Poor boost pressure many times Is caused by a wastegate that is partially stuck open, usually as a result of carbon deposits. These deposits will need to be scraped clean to allow normal closing. To test for this condition, rev the engine to 4.000 rpm and check for exhaust gas exiting the right muffler. If there Is, then the wastegate is stuck open.
4. The wastegate may also be held open by a rusty wastegate actuator pivot bearing. The best method of checking wastegate actuator movement is to locate the 10mm hex nut on the top of the turbocharger and turn the nut with a wrench. Only a small space is available to work In, but sufficient movement can be made to move the actuator In and out.
NOTE: While moving the actuator, spray Yamaha "GP Lube" on the shaft and bushings for lubrication. Some actuators may actually be frozen In place It this is a problem, spray the "GP Lube" liberally on the bushing and work the actuator in and out until It works freely. Turbocharger removal should not be necessary unless the actuator is badly rusted. It is recommended that this procedure be performed during normal tune-up maintenance to prevent sticking problems at a later date.
5. It poor boost pressure is still a problem after the above steps have been followed, the surge tank should be inspected for leakage at the reed valves, relief valve and drain valve Test the drain valve for leakage by holding the end of the drain hose in a cup of water. While on boost, no air leakage should be noticed (bubbles in the water). The reed valves and relief valve must be checked visually for proper closing.
6. Poor boost pressure can also be caused by glazed spark plugs, inoperative boost or knock sensors, or fuel delivery problems.
NOTE: Spark plugs should be replaced whenever performance problems are encountered. Due to the high performance of the turbo engine, spark plug glazing is a greater possibility than with other engines.
If these procedures do not solve the poor boost pressure problem, contact your Regional Technical Advisor.
EXHAUST AND TURBO LUBRICATION TROUBLESHOOTING
Exhaust (or turbocharger) and lubrication problems usually fall Into two categories: oil leakage from the exhaust and lack of lubrication at the turbocharger.
OIL LEAKAGE FROM EXHAUST
Oil leakage from the exhaust, whether on a new machine or one that has been In use, is usually due to the old check valve being stuck in the open position. This allows oil to run into the turbocharger and then into the exhaust pipes. This can occur because the seal in the turbocharger is similar to a piston ring; It only seals when the turbocharger is running. Oil can drain from the turbo Into the pipes or be pushed Into the surge tank when the turbo operates. Inspect the check valve by removing and disassembling it. Thoroughly clean the valve, and inspect the spring/ball for proper closing.
Other causes of oil In the exhaust or surge tank can be due to a blocked oil scavenge (return) line or a poor O-ring seal between the feed and scavenge rotors in the oil pump assembly. A defective oil ring seal in the turbocharger Is possible but always verify that the check valve and oil lines are functioning properly before replacing the turbocharger. Finally, any oil In the exhaust pipes, joint, or mufflers must be cleaned out before running the engine Otherwise excessive smoking and carbon build-up will occur r within the exhaust system.
LUBRICATION FAILURES
If the turbocharger makes noise when the engine is running, you will need to check for physical damage due to foreign objects, for lack of lubrication, or for turbocharger bearing failure. Before removing the turbocharger, remove the left hand muffler and inspect the turbine Some "up and down" and "Side to side" play Is normal. Excessive movement is not. Consult your Regional Technical Advisor it the free play of the turbine compressor shaft Is questionable. To test for turbo bearing operation, start the engine and watch the turbine rotation at idle speed.
Do not look directly Into the turbine outlet as carbon or other exhaust particles could come out at high velocity and cause Injury.
If the turbine rotates freely at idle, then quickly increases rotation when the engine is revved, the turbocharger bearings are in good condition.
Defective bearings will cause the turbine to rotate slowly or erratically. If bearing failure has occurred. you must determine the cause for the failure. Inspect the oil delivery line for kinks or restrictions, type, conditions, and amount of motor oil. Also. question the customer on oil change intervals and the necessity of a proper "warm up" and "cool down" period.
Because the turbocharger runs at very high rpm - nearly 100.000 rpm at engine Idle speed — proper warm-up time is recommended to prevent bearing damage. Also, since the turbocharger runs at very high temperatures, the motor oil must be changed more frequently. Refer to the service manual for specified service Intervals. Another important caution Is to allow the turbocharger to "cool down" for a minute or two before turning off the engine A hot turbocharger can actually cook the small amount of oil on its bearing surfaces. This breakdown of the oil leaves coke deposits In the small oil galleries feeding the bearings which can eventually clog the galleries and lead to lubrication failure.
- Printer-friendly version
- Log in to post comments