Note: this fix does require mechanical ability and judgement. If you have never done anything like this before, you may decide to disassemble the transmission yourself (hey, everyone has to start somewhere) but I suggest you seek out the assistance of someone with some mechanical experience once you get inside. Just changing/repairing the gears may not be enough.
Problem: The transmission kicks and jumps out of second gear, under load. This rapidly gets worse and soon the bike won't take second gear at all.
Cause: The gears that slide to engage first, second and third all share one shaft (the 'drive axle' shaft). 2nd occurs when the 5th wheel gear slides right to engage the 2nd wheel gear. 1st occurs when the 4th wheel gear slides right to engage the 1st wheel gear. (Third happens when the 4th wheel gear goes left into -the 3rd wheel gear if anyone is interested) If the shaft can also wander to the right because of excessive play, then the 2nd and 1st wheel gears can also wander left, disengaging.
There are other possibilities too: if the shifter forks are bent or worn, they won't slide the gears far enough or if the grooves in the drum are worn they won't move the shifter forks far enough. One thing they all have in common: the dogs on the gears are not hardened. They will round off quickly and the problem will rapidly grow worse. They will also tend to bend the shifter forks as the gears kick apart.
The fix (short answer): replace bent parts. Install shims to take up excessive float on the shafts. Replace worn gears with new, or back-cut worn gear dogs for positive engagement.
Long answer: In my own case, I replaced second gear with a good low-mileage used set, but found it started to pop out again after only a few thousand kms. I opened it up again, and on close examination, decided there was too much end-float on the shaft. Yamaha did not install shims in these transmissions from the factory, nor does Yamaha suggest that transmission shimming might be necessary in the pages of the factory manuals. However, they did issue a TSB in 1985 indicating this might be necessary for ALL models. See the attached PDF, below.
However, at the time I faced this issue, I was not aware of the TSB. After considering all my options, I cheated: I cleaned up the casting, layed in a thin layer of JB weld between the oiled bearing and the casting, hung the transmission sideways with the bearing down and torqued down the retainer on the assembled shaft, which was lubed with 80W-90 gear lube first. The excess JB weld squeezed out, gravity kept the excess from getting into the bearing as I cleaned it up, the thick gear lube ensured adequate clearances where maintained between moving parts and the end-float on the shaft was eliminated nicely. Very "redneck", but it worked.
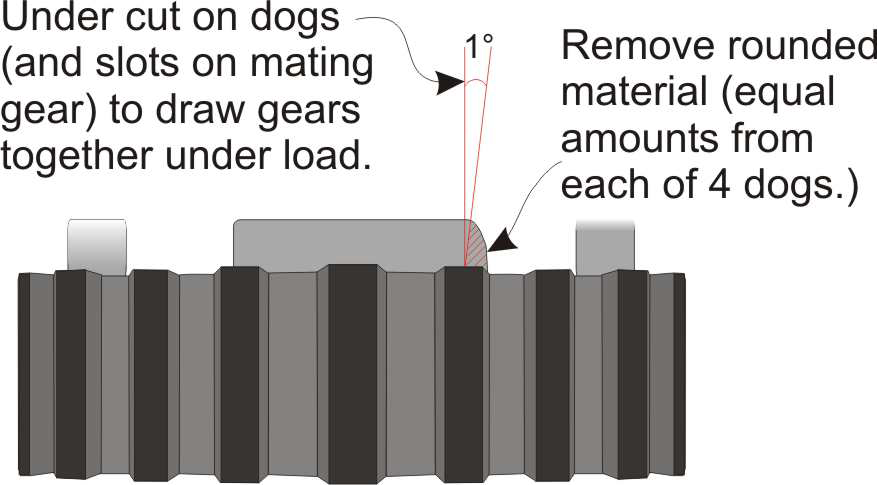
I also had to repair the new gears which were now damaged. I back-cut them 2 degrees using a dremel bit in a drill press with a cross-slide vice and a tilted table. I practiced on the old gear set first to refine my technique, because the dogs are rounded requiring the bit to follow the curve. Again, very redneck.
Disclaimer: I would recommend a new set or taking the gears to a machine shop. I would also seek out the assistance of someone experienced to examine the open transmission and evaluate the end float based on the guidance of the attached TSB after inspecting all parts and replacing any bent or damaged components. My actions were based on my own judgement that the play was excessive and in the absence of that TSB. As of this update, the repair has +/- 30,000kms or so with no problems, so I guess it worked, but Your Mileage May Vary.
All that said, new gears may not be available from Yamaha anymore, and machine shop services may be far too expensive for the average XJ enthusiast. That's where back-cutting the dogs comes in: If the dogs and corresponding grooves are re-shaped with a slight angle, they will pull closer together under load instead of trying to spread apart. The trick is to cut all dogs and grooves exactly the same. Any one of the 4 dogs may engage any one of the 4 grooves at any given shift. If 1 has less material removed than the others, all the load will be carried by that one dog instead of being distributed across all 4 evenly. Also, one must be careful not to cut too great an angle, or it will be difficult to get out of that gear! A picture is worth 1,000 words, so here you go: