TCI Identification
The following is a guide to determing if a used TCI is appropriate for a given machine:
The following is a guide to determing if a used TCI is appropriate for a given machine:
This series assumes you took the carbs apart, and are trying to figure out how to put them back together again. If you haven’t taken them apart yet, it’s a good idea to skim through this first anyway. Address any questions to: xj-owners@micapeak.com, and we’ll try to talk you through it.
Pictures and text by Dwayne Verhey
ADJUSTABLE FOOTREST
Recommended lubricants: Yamaha chain and cable lube or SAE10W30 motor oil
1. Remove the caliper brake hose. Allow fluid in the caliper assembly to drain into a container.
2. Place the open hose end into the container and pump the old fluid out carefully.
3. Remove the caliper mounting bolt and the pad retaining bolt.
4. Remove the caliper assembly from the caliper frame.
5. Remove the dust seal.
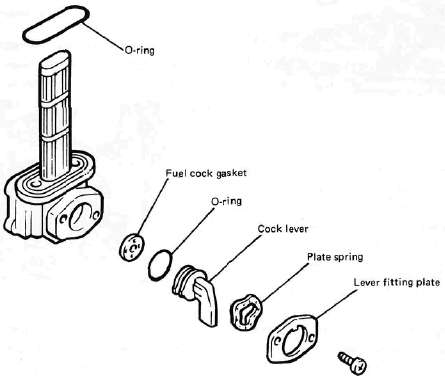
A. Fuel Petcock

If the fuel petcock is leaking or excessively contaminated, it should be removed from the fuel tank and inspected.
1. Remove the fuel tank and position it so that fuel will not spill when the petcock is removed.
2. Remove the petcock and inspect the filter screen. Replace the filter if seriously contaminated.
E. Final Gear Reassembly
1. Install the new rear drive pinion roller bearing. Heat the bare bearing to 150°C (302°F) and use an appropriately adapter to install the roller bearing outer race. Install the inner race onto the drive pinion.
2. Using the press tool No. 2 (special tool) and a press, install the guide collet, new oil seal, and roller bearing into the main housing in that order.
SIDESTAND MONITOR
|
*Main switch is ON. |
SWING ARM
A. Inspection
1. Free play inspection
Remove the rear wheel and both shock absorbers. Grasp the swing arm and try to move it from side to side as shown. There should be no noticeable side play.
ENGINE
A. Valve Clearance Adjustment
ADJUSTABLE HANDLEBAR
Handlebar adjustment
1. Vertical adjustment
a. Remove the switch lead holding plate, cap, two bolts and pull the grip bar as far either up or down by one notch from the standard position. (Three possible positions only)